The zero-drama Yotpo 2025 Email & SMS migration checklist (keep flows, deliverability, and compliance intact)
Switching from Yotpo Email & SMS to another platform can be tricky. If done incorrectly, it can hurt email deliverability, break automations, or even lead to compliance issues with GDPR or TCPA. But with the right steps, you can prevent these problems and ensure a smooth transition. Here’s the process in a nutshell:
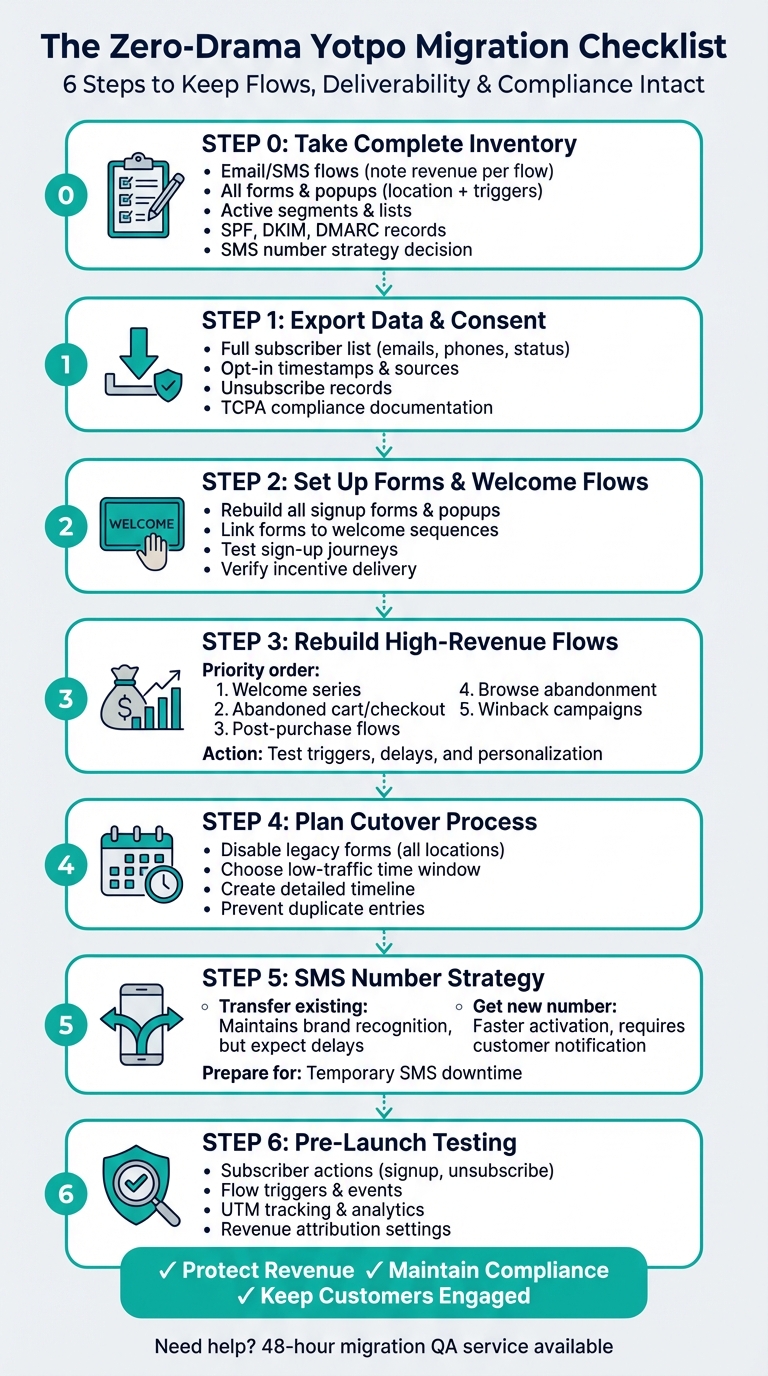
- Inventory Everything: List your email/SMS flows, forms, segments, and sender authentication details to avoid missing anything crucial.
- Export Data Safely: Include subscriber info, opt-in proof, and unsubscribe records to stay compliant.
- Rebuild Key Components: Set up signup forms, welcome flows, and high-revenue automations like abandoned cart emails.
- Plan the Cutover: Disable old forms, pick a low-traffic time, and decide on your SMS number strategy.
- Test Thoroughly: Check everything – flows, triggers, and deliverability – before going live.
Yotpo Email & SMS Migration Process: 6-Step Checklist
Switching to a New Email Marketing Platform (My Step By Step Migration Process)
Step 0: Take a Complete Inventory Before You Start
Before making any changes, start by creating a detailed master spreadsheet. This document should include all your current flows, forms, segments, sender authentication details, and SMS number strategy. Without this inventory, it’s easy to overlook an important flow, miss a popup, or lose track of a segment that’s bringing in revenue.
Catalog All Email and SMS Flows
For each flow, note its trigger, delay, target audience, channel (email or SMS), offer, and the revenue it generated in the last 30 days. That revenue column is key – it helps you prioritize which flows need to be rebuilt first and which ones can wait if time is limited.
Track All Forms and Popups
List every active signup form and popup, including where it appears on your site, what triggers it (like time delay, scroll depth, or exit intent), and its offer (e.g., newsletter signup, discount, or early access). Don’t forget about embedded forms, like those in footers or account pages – they may not be as visible but still gather subscribers.
Document Active Segments and Lists
Focus on active segments such as VIP customers, recent buyers, cart abandoners, and engaged subscribers. You’ll need to recreate these targeting rules in your new platform, and having a clear record will save you hours of trial and error.
Collect Sender Domain and Authentication Info
Retrieve your SPF, DKIM, and DMARC records from your DNS settings. These records are essential for proving to inbox providers that your emails are legitimate. If you migrate without setting these up correctly, your emails could end up in spam folders – or worse, get blocked entirely. Make sure to record your sender domain and any custom authenticated domains.
Decide on Your SMS Number Strategy
Determine whether to keep your current SMS number, which helps maintain brand recognition but may involve delays, or switch to a new number for quicker activation. This decision can impact your migration timeline, especially if SMS is a significant revenue driver for your business.
Once you’ve compiled this comprehensive inventory, you’ll be ready to move on to exporting subscriber data and consent records in the next step.
Step 1: Export Subscribers and Consent Records
Once you’ve completed your inventory, the next step is to export your full subscriber list along with proof of their opt-in status. This is essential for maintaining compliance and safeguarding your sender reputation. To make this process manageable, break it down into two key tasks: exporting subscriber data and gathering opt-in proof.
Export Subscriber Data
Start by downloading your entire subscriber list from Yotpo. This should include key details like emails, phone numbers, subscription statuses, and any other data you’ll need to recreate your segments. Don’t forget to carry over unsubscribe requests to ensure compliance.
Gather Opt-in Proof
Next, export opt-in records that include timestamps and the sources where subscribers signed up. For SMS subscribers, make sure you have documented consent to stay compliant with TCPA regulations. Keep this information stored separately as it may be required for audits or verification purposes.
Step 2: Set Up Forms and Welcome Flows First
Before syncing your subscriber list, make sure your new platform is ready to capture fresh sign-ups. This means rebuilding all your signup forms, popups, and welcome flows. Having these in place ensures you don’t miss out on welcoming new subscribers right away. If you sync your list too early, some subscribers might not receive the welcome messages they’re expecting. Here’s how to get everything set up smoothly.
Rebuild Signup Forms and Popups
Start by recreating all your existing forms and popups. This includes homepage popups, exit-intent overlays, embedded forms on landing pages, and mobile-friendly signup units. Stick to your current branding, messaging, and offers so the transition feels seamless for your audience. Make sure each form is placed exactly where it was before.
Link Forms to Welcome Flows
Once your forms are rebuilt, connect them to your welcome sequences. This ensures new subscribers get an immediate, personalized welcome message. Create separate flows for email and SMS, and make sure any promised incentives – like discounts or freebies – are delivered right away. Double-check that all subscriber details, such as names, phone numbers, and any custom fields, are being captured correctly for personalization.
Test Sign-Up Journeys
Run through the sign-up process yourself using test credentials. Confirm that welcome messages are sent promptly, incentives are delivered as expected, and all links are working properly. This step ensures everything is running smoothly before syncing your full subscriber list.
Step 3: Rebuild High-Revenue Flows First
Once you’ve set up your new sign-up processes, it’s time to shift your focus to the automation flows that drive revenue. These flows are crucial for maintaining smooth operations during the migration process.
Start with your welcome series, as it’s often the first interaction new customers have with your brand. Next, rebuild flows for abandoned checkouts or carts, followed by post-purchase flows. These post-purchase flows should include updates on delivery, cross-sell recommendations, and prompts for reviews. After that, set up browse abandonment flows to re-engage visitors who didn’t make a purchase, and finally, create winback campaigns to reconnect with lapsed customers.
When rebuilding each flow, make sure to replicate the original trigger conditions, delays, and audience filters. Keeping the timing and targeting consistent is key to ensuring these flows perform as expected.
Before syncing your entire subscriber list, thoroughly test each flow. Simulate key actions – like placing test orders or abandoning checkouts – to verify that triggers, personalization, and discount features are all functioning correctly. This step helps catch any issues before going live.
sbb-itb-0879168
Step 4: Plan Your Cutover Process
Once your data export and flow setups are ready, it’s time to map out your cutover process to ensure a smooth migration. This involves deciding how to handle new subscriber data after the switch and setting a clear timeline for transitioning to the new system.
Disable Legacy Sign-Up Forms
As soon as the migration is complete, make sure to disable all legacy sign-up forms. This step is crucial to avoid creating duplicate entries in your database. Identify every location where these forms appear – your homepage, checkout pages, blog sections, and any other integrated areas – and create a checklist to ensure you deactivate each one systematically.
Establish a Cutover Timeline
Pick a time when website traffic is typically low to carry out the cutover. This helps minimize the risk of missing new sign-ups during the transition. Outline a detailed timeline that specifies when and how you’ll move from the old system to the new platform, ensuring every step is accounted for.
Step 5: Plan Your SMS Number Strategy
The choice of SMS number is more than just a technical decision – it directly impacts your migration timeline and overall messaging strategy. Picking the wrong option could disrupt your SMS campaigns at a crucial moment.
Should You Transfer or Get a New Number?
Sticking with your current number can help maintain brand recognition and avoid confusing your customers. However, transferring a toll-free number often involves carrier checks, which can delay your ability to send messages. This can be especially risky during high-sales periods, like holidays, when timely messaging is critical to your revenue.
On the other hand, choosing a new number allows you to start messaging sooner, as you can resume once verification is complete. The downside? You’ll need to inform your audience about the change, and some customers might initially hesitate to engage with messages from an unfamiliar sender. That said, the quick turnaround often outweighs these challenges – especially if your SMS flows, like abandoned cart reminders or post-purchase offers, are vital to driving sales. This decision not only impacts how your audience perceives your brand but also ensures your messaging remains consistent.
Be Ready for Temporary Downtime
If you decide to transfer your current number, prepare for a short period when SMS messaging might be unavailable. To minimize disruptions, schedule the transfer during a quieter time and have a backup plan in place. This could include sending email-only versions of key messages or notifying customers in advance about the brief SMS delay. A little preparation can go a long way in keeping your communication smooth.
Step 6: Complete Pre-Launch Testing
Thorough testing before launch ensures everything in your new setup works as planned. Think of testing as your safety net – it catches issues before they become real problems.
Test Subscriber Actions
Walk through the subscriber experience step by step. Use a test email address and phone number to sign up. Check if you receive a confirmation message, if the right tags are applied, and if consent timestamps are properly recorded. Don’t stop there – test the unsubscribe process too. Click the unsubscribe link in an email and send "STOP" via SMS. Make sure both methods instantly suppress your test account as expected.
Test Flow Triggers and Events
Now, focus on your automated workflows. Place a test order and simulate an abandoned checkout. Does the abandoned cart flow trigger as it should, delivering the correct product details and discount codes? After completing a test purchase, confirm that your post-purchase flow activates. Whether it’s a delivery update, a cross-sell offer, or a review request, every trigger needs to work flawlessly. Even small errors here can impact your revenue.
Check Reporting and Tracking
Finally, review your test emails. Click every link to ensure UTM parameters are correctly appended and that clicks are registering in your analytics. Compare the revenue attribution settings on the new platform with your old one. Any differences in attribution can lead to skewed reports, so catching these early will save you from misreading performance data later.
Conclusion: Get Expert Help with Your Migration
Switching from Yotpo doesn’t have to be overwhelming. This checklist – covering inventory, export, rebuild, and testing – lays out the key steps. But the real challenge lies in executing it without hiccups that could impact your revenue.
That’s where Enflow Digital comes in. We offer a 48-hour migration QA service to ensure everything is set up correctly. Need extra attention to detail? Our team can dive deeper, reviewing your cutover checklist, testing all flows, and confirming deliverability before you make the switch. This includes verifying flow triggers, checking consent records, confirming SPF/DKIM/DMARC settings, and ensuring your SMS number strategy won’t cause interruptions.
If you’re looking for more than just QA, we’ve got you covered. From rebuilding your abandoned cart flows to managing your entire email and SMS marketing strategy, our team specializes in ensuring your post-migration setup is optimized for success. With years of experience in eCommerce migrations, we know how to avoid common pitfalls and keep everything running smoothly.
The goal is straightforward: protect your revenue, maintain compliance, and keep your customers engaged throughout the process. A well-executed migration means no drama, no lost sales – just a seamless transition.
Ready for a stress-free migration? Let Enflow Digital handle the hard work, so your new setup is fully tested and ready to perform. Reach out today to make your Yotpo exit as smooth as possible.
FAQs
What are the essential steps to ensure compliance when migrating from Yotpo Email & SMS?
When transitioning from Yotpo Email & SMS, it’s crucial to prioritize compliance. Start by exporting your subscriber list along with documented proof of opt-in consent. This step ensures you have the necessary records to meet legal requirements.
Next, time the removal of old forms and halt new data collection in Yotpo carefully to prevent any syncing problems during the migration process.
Before wrapping up the migration, thoroughly test key functions like unsubscribe/STOP requests to ensure they operate correctly and avoid sending unwanted messages. Also, double-check consent tags, review revenue attribution settings to prevent any inconsistencies, and confirm deliverability settings to keep everything running smoothly and within compliance guidelines.
What’s the best way to rebuild and prioritize high-revenue automation flows during migration?
When migrating, the key to minimizing revenue loss is to rebuild your automation flows based on their impact on revenue. Start with the welcome series, as it’s often the first interaction with new customers. Next, tackle abandoned checkout/cart flows, which are crucial for recovering potential sales. Then, move on to post-purchase flows, such as delivery updates, cross-sell opportunities, and review requests. After that, address browse abandonment flows to re-engage visitors, and finally, focus on winback campaigns to reconnect with past customers.
Before launching each flow, test them thoroughly to ensure all triggers, tags, and events function as expected. A detailed QA checklist can help you identify and fix issues early, ensuring a smooth transition and steady revenue during the migration process.
How can I minimize disruptions when switching to a new SMS number?
Starting the SMS number transfer process early is key to avoiding any disruptions. Make sure to confirm the timeline for toll-free verification ahead of time. If time is of the essence and you need a fast setup, opting for a new number instead of transferring an existing one can help ensure your messaging remains uninterrupted.